Wednesday, November 27, 2013

Pumpkin Cake

This is an old recipe I have had for a long time and recently dug it out for a requested birthday cake. We have made it a few times since and it seems to be a crowd pleaser. One of my biggest pet peeves is dry cake. I hate it. This one is not. The pumpkin really makes it nice and moist.


Before I type out the recipe, and before I'm tempted to take more credit than what is due me...I gladly admit that my wife is a cake decorator from way back (sorry hon, not that far back...). She doesn't get to do it much these days, but she is very good at it. Which is a great thing, since I love to cook and bake and share recipes, but I do not decorate. She make my stuff look better.

Here we go:

Cake:

2 C of sugar
1 C vegetable oil I do have an old olive oil cake recipe I need to dig up again)
4 large eggs
2 C AP flour
2 t baking soda
1 t baking powder
2 t cinnamon
1 t ginger (ground, powdered)
1/2 t salt
2 C pumpkin puree

Preheat oven to 350°. Grease (I used butter) and flour 2 9" rounds (I use spring forms). Mix the sugar, oil, eggs, and salt, thoroughly. In a separate bowl, combine flour, baking soda, baking powder, cinnamon, and ginger, stir. Slowly, with the mixer on low, start adding dry ingredients. Scrape at least once, but don't over mix as cake batters can get tough. Add pumpkin, mix on low, scrape, and mix a little more. Pour into the 2 prepared pans and bake for 35-45 minutes or until slightly browned with a concave top and toothpick comes out clean. 

Frosting:

1 stick butter, room temp (1/4 lb, 1/2 c)
1/4 c shortening
1, 8 oz brick cream cheese (Philadelphia has better consistency and taste)
1 1/2 t vanilla
2 lbs powdered sugar
1/4 t salt
Colored course sugar crystals optional (as you see in the pic, we used gold)

Mix all ingredients on low, scrape at least once.
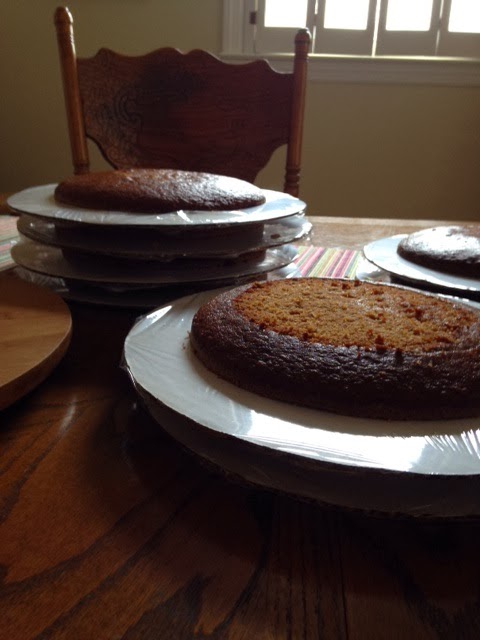
We typically do a 2-layer, but we did a 4-layer this time. If you do what we did you will need at least 1 1/2 to 2 times the frosting recipe. My wife did the decorating, as I said, and it looked great. It also tasted great. You will also need to cut the curved top layer off to make it level, see pic below.


In this particular cake, we used some leftover salted caramel I had just made and separated the frosting into plain and caramel. See the 2 colors above. That recipe can be found in an earlier post, "Salted Caramel".


Buon Appetito!


Tuesday, November 26, 2013

Quotable Quotes #2

The most remarkable thing about my mother is that for thirty years she served the family nothing but leftovers.  The original meal has never been found.  ~Calvin Trillin

As for butter versus margarine, I trust cows more than chemists.  ~Joan Gussow


Life is a combination of magic and pasta.  ~Federico Fellini

Don't eat anything your great-grandmother wouldn't recognize as food."  ~Michael Pollan

A fruit is a vegetable with looks and money.  Plus, if you let fruit rot, it turns into wine, something Brussels sprouts never do.  ~P.J. O'Rourke

The trouble with eating Italian food is that five or six days later you're hungry again.  ~George Miller

Fish, to taste right, must swim three times - in water, in butter, and in wine.  ~Polish Proverb

Cooking is like love.  It should be entered into with abandon or not at all.  ~Harriet Van Horne, "Not for Jiffy Cooks," Vogue magazine, 1956

Cheese - milk's leap toward immortality.  ~Clifton Fadiman


To the old saying that man built the house but woman made of it a "home" might be added the modern supplement that woman accepted cooking as a chore but man has made of it a recreation.  ~Emily Post


A recipe has no soul. You, as the cook, must bring soul to the recipe. ~Thomas Keller

Bread deals with living things, with giving life, with growth, with the seed, the grain that nurtures.  It is not coincidence that we say bread is the staff of life.  ~Lionel Poilane


A nickel will get you on the subway, but garlic will get you a seat.  ~Old New York Proverb

We are living in a world today where lemonade is made from artificial flavors and furniture polish is made from real lemons.  ~Alfred E. Newman


Rice is born in water and must die in wine.  ~Italian Proverb


There is one thing more exasperating than a wife who can cook and won't, and that's a wife who can't cook and will.  ~Robert Frost

Monday, November 25, 2013

Quotable quotes #1

Vegetables are a must on a diet.  I suggest carrot cake, zucchini bread, and pumpkin pie.  ~Jim Davis

Do vegetarians eat animal crackers?  ~Author Unknown


Those who forget the pasta are condemned to reheat it.  ~Author Unknown

It would be nice if the Food and Drug Administration stopped issuing warnings about toxic substances and just gave me the names of one or two things still safe to eat.  ~Robert Fuoss


As a child my family's menu consisted of two choices:  take it or leave it.  ~Buddy Hackett


Edible, adj.:  Good to eat, and wholesome to digest, as a worm to a toad, a toad to a snake, a snake to a pig, a pig to a man, and a man to a worm.  ~Ambrose Bierce


One of the very nicest things about life is the way we must regularly stop whatever it is we are doing and devote our attention to eating.  ~Luciano Pavarotti and William Wright, Pavarotti, My Own Story

My favorite animal is steak.  ~Fran Lebowitz


When baking, follow directions.  When cooking, go by your own taste.  ~Laiko Bahrs

The poets have been mysteriously silent on the subject of cheese.  ~G.K. Chesterton


Never work before breakfast; if you have to work before breakfast, eat your breakfast first.  ~Josh Billings


Vegetables are interesting but lack a sense of purpose when unaccompanied by a good cut of meat.  ~Fran Lebowitz


A bagel is a doughnut with the sin removed.  ~George Rosenbaum


I don't think America will have really made it until we have our own salad dressing.  Until then we're stuck behind the French, Italians, Russians and Caesarians.  ~Pat McNelis


Saturday, November 23, 2013

Alternative Stuffing/Dressing

Well, it's getting close to turkey day and while we will be out of town this year and not making a ginormous meal at home, I thought I might share one of the dishes we typically make. We were asked to be a part of our churches youth group early thanksgiving so we had the chance to make a few things early. We elected to make our couscous stuffing/dressing and a pumpkin cake with cream cheese frosting. Maybe I'll post something about the cake sometime. For now, however, here's what I did: *Disclaimer first: as I often "disclaim", the hardest part is measurements as I often make dishes by tossing a bit of this and a bit of that. I will try to get close approximations, though.
So, way back when, I was perusing ideas for a stuffing idea that wasn't the cliche typical stuffing of Thanksgiving's gone by, and I came across a recipe using couscous instead of bread. I have since adapted it countless times and rarely make it the same way twice. This is what I did today:

Couscous (I was making a big batch, so I did 4 C broth, 4 C couscous)

Chicken broth, 4 C

Italian sausage, 6 links (I used sweet this time, although I prefer hot)

Toasted pecans, about 1 C

2 whole garlic bulbs

Mushrooms, about 1# sliced

Roasted red peppers, 12oz-15oz jar, julienned (I roast my own often, but did not have time. I will post something about that sometime).

Dried cranberries, about 1 C

Grilled fennel, 1 bulb

Rosemary, thyme, salt, garlic, black pepper. (I always season any stock I'm using, whether for rice, couscous, polenta, etc.)

Cook the Italian sausage and slice (I use scissors and tongs) and set aside. Toast the pecans in a frying pan, set aside. Roast the garlic in the oven with a little olive oil and salt @ about 350° for 20 minutes or so, let cool. Cook mushrooms in a frying pan with a little butter and salt, set aside to cool, then chop slices. Cut fennel bulb into slices and grill with a little olive oil and salt (I used a grill pan on the stove). Let cool and chop.
Heat chicken stock in a pan with rosemary, black pepper, thyme, granulated garlic, and salt. Bring to a boil, add couscous, cover and remove from heat. Let stand for about 5 minutes and then fluff with a fork.
Add all ingredients in a large bowl, along with cranberries and roasted peppers, stir. I typically add another cup or so of chicken stock before I out it in a roasting pan to heat. Cover roasting pan with foil, heat about 300° for 30 minutes or so. Since everything is cooked, you don't want to cook it more or to dry out. That's all folks. It seemed to be a big hit. Also, be creative, maybe add apples or almonds instead of pecans, or sun-dried tomatoes perhaps...Enjoy, experiment!


Pecans

Roasting garlic


Italian sausage from my bro in MA, the best!

Finito!


Buon Appetito!

Wednesday, November 20, 2013

My first beef wellington.

Complicated. That's the word that comes to mind. However, the flavors were amazing. First, I need to admit that I know very little about English food, and the stigma of it may or may not have any truth to it. All I know is that this was originally from England, and it tasted great.
Once again, I perused many recipes, watched a few short clips and then just had to wing it. This recipe should be reserved for special events, since, as I said it's complicated, but also expensive. It's best to look for tenderloin on sale. For those who may not know what beef wellington is, it's a tenderloin wrapped in some type of ham, along with a mushroom filling, then wrapped in puff pastry dough. Here we go:

Ingredients:

Beef tenderloin (I used 1.5 lbs for our family of four)

Mushrooms (about a half a lb was sufficient, but then you cannot have too many shrooms. Also, I used the typical white, you can use your favorite)

Shallots, about 3 bulbs (many recipes did not call for them, but some did. They are more mild and a bit sweeter than onions)

Prosciutto (1/4 lb thinly sliced. Some recipes call for Serrano ham, some for Prosciutto)

Yellow mustard (classic recipes call for an English mustard, not stoneground, but regular old yellow works fine)

Puff pastry, 1 sheet (I bought mine)

Salt, pepper, garlic to taste (course ground sea salt)

2 eggs beaten

Here's what I did. Preheat oven to 400°

Finely chopped the shallots and cook them down with a little olive oil and salt, then set them aside.


Then using a food processor, very finely chop the mushrooms, almost to a puree, but not quite. Using a dry frying pan (no fat) cook the mushrooms down, on medium to high heat, to get all the water out. This step is extremely important, shrooms are like sponges and the filling would be way too runny if this was not done


Set aside the mushrooms to cool and add olive oil to the pan. Season the beef tenderloin with salt, garlic, and black pepper on all sides (including the ends). In the hot pan, sear all sides, including ends of tenderloin and set aside to rest. Before it cools, brush mustard on the whole surface of the loin and let cool. 


Lay out plastic wrap on the counter and line with the prosciutto, then spread the mushroom puree and the shallots over it. Once it's spread evenly, place the loin on top and roll the whole thing as tight as possible, using the plastic wrap to help roll and then cover. Twist the ends of the plastic tightly and place in the fridge to completely cool and maintain it's shape. 


Lay out, or roll out the puff pastry (however you buy it or make it) on a floured surface. Remove plastic wrap from the prosciutto covered loin and then roll loin in the puff pastry. Use the beaten eggs to seal the pastry. Make sure it's wrapped tightly and all seams are crimped. Place on a parchment paper covered sheet pan. Brush the remaining egg wash over the entire dough. Using the back of a knife, lightly score the top (do not cut through). Sprinkle the top with course ground sea salt.  Bake for about 40-45 minutes or until golden brown (not too much longer as the loin should be a medium rare inside). Let rest for 10-15 minutes before cutting. 


So, there you have it. Seem complicated? It is. Like I said, this is special occasion material. You may notice that I baked on a foil covered baking sheet, but I would highly recommend parchment as I said in the directions, it stuck a bit. Anyway, I learned a few things and the flavor was amazing. Kudos to the English cuisine, I guess. 


Buon Appetito!


Tuesday, November 19, 2013

2 ingredient fudge

I know, I know, it's cheating a bit, but this turned out pretty good. This fudge has only 2 ingredients and no real cooking. Here it is:

1 1/2 bags chocolate chips (11.5 oz size)
1 can sweetened condensed milk (14 oz)

Put the sweetened condensed milk in a microwaveable bowl along with the chocolate chips. Microwave for 1 minute, stir, then microwave again for about 30 seconds, stir well and scrape into an 8 x 8 pan lined with parchment. Let cool in the fridge for at least an hour.
So, your microwave is different so whatever it takes to just melt the chips. Do not let it go too long as the chips will burn. The cooling may take longer as well, depending on the type of pan, fridge setting, etc. Let cool until firm and able to be cut.


Since the holidays are upon us, it's nice to have some simple recipes, too. Of course, I'm telling myself this to assuage the guilt of cheating on the fudge...


Buon Appetito!

Saturday, November 16, 2013

Ricotta Cookies

I remember these cookies, among several others, that we used to get at the Italian bakery with grandma. The way I remember them, they had little multi-colored round sprinkles on top. I've been perusing the recipe-shere and adapted several recipes into one I liked. The basic recipe is pretty standard and straightforward with little variance,  but, like the shortbread cookies I posted about in the past, these are extremely versatile. Once you get the base recipe down, then you can venture out and experiment with different flavors. This time, I used almond extract in the cookie dough as well as in the icing. Here are the ingredients:

Cookie Dough:

2 C sugar
1/2 lb butter (1 C/2 sticks)
1 lb ricotta cheese (a 15oz container is fine)
2 eggs (preferably large)
4 C AP flour
1 1/2 t baking soda
1 1/2 t baking powder
1 t salt (I use only sea salt now)
1 t pure vanilla extract (never use imitation extract)
2 t pure almond extract

Icing:

3 C powdered sugar
1/2 C milk
2 t pure almond extract

Heat the oven to 350°

I use a stand mixer for this.

Cream butter and sugar,  add ricotta, vanilla, almond, salt, and eggs, mix until creamy. Add flour (on low to avoid catastrophe), baking soda, and baking powder. Scrape at least once, but don't over mix as they can get tough.

I used a cookie scoop, and this time made 2 different sizes, just for experimenting sake.

Now, here's a fun fact. I looked at a bunch of recipes before coming up with mine and there was quite a mixed bag concerning the cookie sheet, greased or un-greased. There was more of a general consensus on parchment paper, though, and since this is a sticky dough, I would recommend parchment.


The scoop in the picture is a #50, but I also used a #30. With the smaller scoop I would have had about 11 doz, and with the bigger scoop, about 4 doz.


Bake for about 15 minutes or until just starting to get a very light brown, these are easy to over bake, so keep an eye on them.


Let cool on wire racks and then ice.

Icing:

3 C powdered sugar
1/2 C milk
2 t almond extract


As I said, these are versatile. You can substitute the almond extract (and vanilla) for lemon in the dough and icing, add lemon zest to both and voila, lemon ricotta. Or do the same with orange extract and orange zest. Be creative. 


Buon Appetito!


Friday, November 15, 2013

Apologies all around

Well, here we are in a learning curve, always. I have tried to mix it up a bit by posting recipes I make, some Italy pics form time to time, some travel stories, etc. I have also posted recipes I thought were interesting that I ran across. I like to peruse recipes, test them when I can, try new things and adapt them to what I like. It's somewhat therapeutic for me. Of course, I also like people to enjoy my cooking. There are few things more satisfying than someone enjoying something you have created. Anyway, I'm issuing a general apology as some of the things I have posted were not done in the correct manner in regards to copyright issues. It was never my intent to "steal" any intellectual property at any time. My understanding was that as long as credit is given, you can repost things, especially when they are shared over and over on Facebook. Well, come to find out there are certain copyright laws, and etiquette rules that I misunderstood. Some things are still vague, but as I continue to research, I trust they will, in time, come clear. For instance, an ingredient list cannot be copyrighted, but a word for word description and/or method can, as well as pictures. Or you can evidently change 3 ingredients and call the recipe your own, given the pics are yours and methods are in your own words. All that to say, that it gets a bit confusing at times, but I can say unequivocally that I agree with one blogger's thoughts when he said to err on the side of caution (which I apparently have not) and give credit as much as possible (which I have attempted to do), regardless of changing a few ingredients or descriptions.

For those that know me, I hope you know I wouldn't intentionally "steal" content. I guess, the old saying, ignorance is bliss, is not always accurate. So, as we continue through this learning process, I will research and attempt to correct any inadvertent mistakes in posting that I have made. Of course in saying all this, I realize it only goes to a handful of people that actually look at the blog periodically. Nonetheless, it must be said. I will post a link to an interesting article or two below concerning this subject.

I would also be a bit remiss if I didn't mention 2 friends that have helped me realize a few fixes I needed to make. Thanks to Aimee Wimbush-Bourque with http://www.simplebites.net/ and Sommer Collier with http://www.aspicyperspective.com/. Check out their blogs, they're the real deal. Thanks for your time.

Here's one article: http://foodblogalliance.com/a/recipe-attribution/
And (same guy): http://foodblogalliance.com/a/what-to-do-when-your-content-is-lifted/


As always,


Buon Appetito!


Tuesday, November 12, 2013

I make this bread at least once or twice a week...

As I've said before, I prefer to add recipes here that I personally use, have modified, etc. However, as time is not always on my side, I have to post recipes that are sent to me or that I have stumbled upon as well. Having said that, here's one I have used for some time that  friend gave me. It's easy and it's awesome to have fresh homemade bread a couple times a week. This recipe makes 2 loaves, and depending on my mood, I typically make one in a ceramic loaf pan and one in a 9" round ceramic pan. However, the other night, I made this recipe into 6 individual loaves, baked them on the pizza stone, and then hollowed them out to be filled with homemade New England clam chowder, very nice. Ok, enough banter, here it is:

2 1/2 C warm water (about 100°F)
2 T yeast
2 T sugar
2 t salt
2 t lemon juice
6 1/2 C AP flour

Whisk yeast, sugar, salt, and lemon juice into warm water in mixer bowl, let sit for a minute until yeast dissolves and it becomes a bit frothy.
Put on mixer stand, and using the bread hook, mix on low while slowly adding the flour. once it's all incorporated mix on medium for a few minutes to knead the dough and get the gluten working. Scrape onto floured surface and knead by hand for another minute or so. Divide in half and rise in two bigger bowls or baking dishes (like loaf pans) until ready to bake. After an hour or so, the dough will be doubled. Bake at 350° for 35-40 minutes. Loaves should be just golden and sound hollow when tapped on the bottom. Let cool on wire rack and gnom gnom gnom....


I scored these 2, brushed with olive oil, sprinkled with rosemary and course ground sea salt.


I have another loaf I like to make, a Boston brown bread, very hearty, with rye, whole wheat, and cornmeal, golden currant, and molasses. Alas, I have no pics at this time...It is baked in a large can in a water bath for 2 hours. Very nice on a cool fall/winter night. More on that later, with pics, hopefully. So, have fun, and as always, experiment!


Buon appetito!


Monday, November 11, 2013

Flourless Chocolate Chip Chickpea Blondies with Sea Salt, too healthy?

Flourless Chocolate Chip Chickpea Blondies with Sea Salt {vegan, gluten-free & healthy}


Prep time
5 mins

Cook time
20 mins

Total time
25 mins


Secretly healthy blondies made with chickpeas, peanut butter, and chocolate. Taste amazingly like peanut butter cookies. Flourless and no butter! Natural ingredients.
Author: Monique of AmbitiousKitchen.com
Recipe type: Bar, Healthy, Vegan, Gluten-free, Snack, Dessert
Serves: 16

Ingredients
  • Cooking Spray
  • 1 can (15 oz) chickpeas, rinsed and drained
  • 1/2 cup all natural almond butter or peanut butter
  • 1/3 cup pure maple syrup or agave nectar (you can also use honey if you’re not vegan)
  • 2 teaspoons vanilla
  • 1/2 tsp salt
  • 1/4 teaspoon baking powder
  • 1/4 teaspoon baking soda
  • 1/3 cup vegan (or regular) chocolate chips plus 2 tablespoons
  • sea salt, for sprinkling


Instructions
  1. Preheat oven to 350 degrees F and spray 8×8 inch pan with nonstick cooking spray.
  2. In a food processor, add all ingredients except chocolate chips and process until batter is smooth. Fold in 1/3 cup of chocolate chips, I like to use dark chocolate because it has less sugar but it’s up to you. Note: Batter will be thick and super delicious, so you could actually just eat it on it’s own!
  3. Spread batter evenly in prepared pan then sprinkle 2 tablespoons of chocolate chips on top. (The batter may stick to your spatula, so I like to spray my spatula with nonstick cooking spray first.) Bake for 20-25 minutes or until toothpick comes out clean and edges are a tiny bit brown. The batter may look underdone, but you don’t want them to dry out!
  4. Cool pan for 20 minutes on wire rack. Sprinkle with sea salt then cut into squares. Makes 16 blondies.


Notes
Adding an egg to the batter will make it more cake-like, but not vegan.
You can use your favorite nut butter, just make sure it’s all natural.
Feel free to add in other things according to your dietary needs like nuts, dried fruit, or other types of chocolate.


Buon Appetito!

Friday, November 8, 2013

More punkin' chunkin'!

Cream-Filled Pumpkin Cupcakes Recipe


Ingredients
  •     2 cups sugar
  •     3/4 cup canola oil
  •     1 can (15 ounces) solid-pack pumpkin
  •     4 eggs
  •     2 cups all-purpose flour
  •     2 teaspoons baking soda
  •     1 teaspoon salt
  •     1 teaspoon baking powder
  •     1 1/2 tsp pumpkin pie spice
  •     FILLING:
  •     1 tablespoon cornstarch
  •     1 cup milk
  •     1/2 cup shortening
  •     1/4 cup butter, softened
  •     2 cups confectioners’ sugar
  •     1/2 teaspoon vanilla extract, optional
  •     Whole cloves, optional
Directions
  1.     Preheat oven to 350°. In a large bowl, beat sugar, oil, pumpkin
  2.     and eggs until well blended. Combine flour, baking soda, salt,
  3.     baking powder and pumpkin pie spice; gradually beat into pumpkin mixture
  4.     until well blended.
  5.     Fill paper-lined muffin cups two-thirds full. Bake 18-22 minutes or
  6.     until a toothpick inserted in center comes out clean. Cool 10
  7.     minutes before removing from pans to wire racks to cool completely.
  8.     For filling, combine cornstarch and milk in a small saucepan until
  9.     smooth. Bring to a boil, stirring constantly. Remove from heat; cool
  10.     to room temperature.
  11.     In a large bowl, cream shortening, butter and confectioners’ sugar
  12.     until light and fluffy. Beat in vanilla if desired. Gradually add
  13.     cornstarch mixture, beating until smooth.
  14.     Using a sharp knife, cut a 1-in. circle 1 in. deep in the top of each
  15.     cupcake. Carefully remove tops and set aside. Spoon or pipe filling
  16.     into cupcakes.


For the top I used Cream Cheese Frosting
(Servings: 24)
Ingredients:
  • 2 (8 ounce) packages cream cheese,
  • softened
  • 1/2 cup butter, softened
  • 2 cups sifted confectioners’ sugar
  • 1 teaspoon vanilla extract
Directions:
In a medium bowl, cream together the cream cheese and butter until creamy. Mix in the vanilla, then gradually stir in the confectioners’ sugar. Store in the refrigerator after use.


Buon Appetito!

Thursday, November 7, 2013

Cranberry Bliss Bars


These bars are topped with a white-chocolate-cream cheese frosting. They’re sprinkled with dried cranberries and drizzled with white chocolate squiggles.
The first layer is blondie-like- so sweet, soft-ish, but firm- and a great base for this bar. There’s white chocolate and dried cranberries mixed into the base too.
This recipe will make a total of 16 cake bars, at a fraction of the cost of the original.

Cake
  • 3/4 cup (1 1/2 sticks) butter, softened
  • 1 1/4 cups packed light brown sugar
  • 3 eggs
  • 2 tablespoons minced crystallized ginger
  • 1 1/2 teaspoons vanilla extract
  • 1/2 teaspoon salt
  • 1 1/2 cups all-purpose flour
  • 1/2 teaspoon baking powder
  • 3/4 cup chopped sweetened dried cranberries
  • 4 ounces white chocolate, cut into chunks
Frosting
  • 4-ounces cream cheese, softened
  • 3 cups powdered sugar
  • 4 teaspoons lemon juice
  • 1 teaspoon vanilla extract
  • 1/4 cup chopped sweetened dried cranberries
Drizzled Icing
  • 1/2 cup powdered sugar
  • 1 tablespoon milk
  • 2 teaspoons vegetable shortening

  • Directions

1. Preheat the oven to 350 degrees F.

2. Make cake by beating the butter and brown sugar together with an electric mixer until smooth. Add the eggs, ginger, vanilla, and salt and beat well. Gradually mix in the flour and baking powder until smooth. Mix the chopped dried cranberries and white chocolate chunks into the batter by hand. Pour the batter into a buttered 9 x 13-inch baking pan. Use a spatula to spread the batter evenly across the pan. Bake for 25 to 30 minutes, or until the cake is lightly browned on top. Allow the cake to cool.

3. Make the frosting by combining the softened cream cheese, powdered sugar, lemon juice, and vanilla in a medium bowl with an electric mixer until smooth. When the cake has cooled, use a spatula to spread the frosting over the top of the cake.

4. Sprinkle 1/4 cup of chopped dried cranberries over the frosting on the cake.

5. Make the drizzled icing by whisking together powdered sugar, milk, and shortening. Drizzle this icing over the cranberries in a sweeping motion with a squirt bottle or fill a small plastic storage bag with the icing and cut off the tip of one corner.

6. Cover the cake and let it chill out in the fridge for a couple hours, then slice the cake lengthwise (the long way) through the middle. Slice the cake across the width three times, making a total of eight rectangular slices. Slice each of those rectangles diagonally creating 16 triangular slices.


Buon Appetito!

Wednesday, November 6, 2013

Apple Streusel Cheesecake Bars


Apple Streusel Cheesecake Bars

Prize-Winning Recipe 2007! Oatmeal cookie mix and pie filling make it easy to get a delicious apple pie-like bar.
Credits: bettycrocker.com

Ingredients
  •     1 pouch (1 lb 1.5 oz) Betty Crocker® oatmeal cookie mix
  •     1/2 cup firm butter or margarine
  •     2 packages (8 oz each) cream cheese, softened
  •     1/2 cup sugar
  •     2 tablespoons Gold Medal® all-purpose flour
  •     1 teaspoon vanilla
  •     1 egg
  •     1 can (21 oz) apple pie filling
  •     1/2 teaspoon ground cinnamon
  •     1/4 cup chopped walnuts


Directions
  1.     1 Heat oven to 350°F. Spray bottom and sides of 13×9-inch pan with cooking spray.
  2.     2 Place cookie mix in large bowl. With pastry blender or fork, cut in butter until mixture is crumbly and coarse. Reserve 1 1/2 cups crumb mixture; press remaining crumbs in bottom of pan. Bake 10 minutes.
  3.     3 Meanwhile, in large bowl, beat cream cheese, sugar, flour, vanilla and egg with electric mixer on medium speed until smooth.
  4.     4 Spread cream cheese mixture evenly over partially baked crust. In medium bowl, mix pie filling and cinnamon. Spoon evenly over cream cheese mixture. Sprinkle reserved crumbs over top. Sprinkle with walnuts.
  5.     5 Bake 35 to 40 minutes longer or until light golden brown. Cool about 30 minutes. Refrigerate to chill, about 2 hours. For bars, cut into 6 rows by 4 rows. Store covered in refrigerator.


Buon Appetito!

Tuesday, November 5, 2013

Carne!

Meat, glorious meat!


Prep time:  20 mins
Cook time:  45 mins
Total time:  1 hour 5 mins
Ingredients
  • 2.26 Lb Flank Steak (2 steaks)
  • 16 oz Spinach
  • 7 oz Roasted Peppers
  • 4 oz Bleu Cheese
  • 2 Tbsp Almond Flour
  • 1 Egg Yolk
  • ½ tsp Garlic Powder
  • ½ tsp Onion Powder
  • ½ tsp Pepper
  • ½ tsp Salt

Instructions
  1. Start by placing the grain of the flank steak vertically, aka from front to back
  2. Using a sharp knife, butterfly the flank steak by cutting it from right to left
  3. Microwave some frozen spinach and drain the liquid
  4. Slice the roasted red peppers
  5. Combine remaining ingredients with the spinach and mix
  6. Spread the mixture over the steak and roll with the grain
  7. Truss the steak with cotton kitchen twine
  8. Wrap with saran wrap and marinate for at least 30 minutes
  9. Cook at 425 degrees for 35 minutes
  10. Then broil for 10 minutes, rotating after 5 minutes
  11. Cover with foil and rest for 5-10 minutes before serving


Buon Appetito!

Monday, November 4, 2013

A little breakfast anyone?


Breakfast Bowl For One

INGREDIENTS

  • 1 slice thick cut bacon
  • 1/2 sweet potato, grated
  • 1 tsp. ground cumin
  • 1 tsp. chili powder
  • 1 cup baby spinach
  • 1 large egg
  • 3 basil leaves, torn
  • 1 pinch coarse salt and freshly ground pepper

DIRECTIONS

  1. Heat a medium skillet over medium. Add the bacon and cook until rendered and crispy, 6 minutes. Remove from pan and place on some paper towels to soak up the fat. Drain all but 1 Tbs. bacon fat. Once bacon has cooled, chop it into crumbles.
  2. Add the grated sweet potato to the pan, and season with cumin, chili powder and a pinch of salt and pepper. Saute potatoes until they soften and are browned on all sides, 8 minutes.
  3. Scoot the hash browns to one side and add the spinach. Cook to wilt, 2 minutes.
  4. In the meantime, bring a small saucepan to a boil. Add the egg, cover and boil for 6 minutes. Remove with a slotted spoon and gently peel the shell under cool running water. With only 6 minutes you will end up with a soft boiled egg. Add two minutes for a thicker yolk, and go a full 10 to 12 for a hard boiled.
  5. Arrange the hash browns in the bottom of a small bowl. Place the spinach on top, followed by the egg, split in half. Garnish with another small pinch of salt, black pepper, the crumbled bacon and the torn basil leaves.


Buon Appetito!

Basilcello

Yup, that's a real thing. So, we have a few friends that have prolific basil plants growing, and we have been fortunate enough to reap some of the benefit of that. I had a huge bunch I needed to use, so I made a nice bolognese sauce with fresh basil (maybe more on that in a later post). Even so, I still had a bunch. I looked up basil liqueurs and found that basilcello is a real thing. So, using my basic procedure for liqueurs, I put the remaining leaves (a good 4 C or so) into a gallon plastic jar with 1.75 L of 100 proof vodka and let it steep. I only had it in there for a few days and the basil smell was pretty strong, so I strained it. I then added the cooled simple syrup (3 C purified water, tap does not taste the same, and 1 1/2 C sugar). It turned out pretty good, but I need to practice and tweak a bit. I added 1 more C of purified water and stored it in the freezer. It's actually a pretty mild flavor, and while I didn't know how the sweetness with basil would work, it seems to be fine. Updates will be forthcoming.

Before

After

After after


Buon Appetito!

Saturday, November 2, 2013

Butternut squash bisque

I finally have a minute to do one of my recipes, which takes me a bit longer to compose, but is what I really prefer to do...So, it's definitely not a new thing, many people have made this, but I have had some requests so here goes. I call it a bisque partly because it sounds fancy, but partly because it's really thick. The majority of it is roasted butternut squash, specifically "roasted". I say that because I see recipes for canned squash all the time and it is not the same. I get whole butternut squashes, split them in half, take out the seeds and pulp, brush with olive oil, sprinkle some garlic salt and roast them in a 350° oven. The taste is so much richer than anything canned or boiled. I'l try to replicate the recipe here, although for the seasoning I do it by taste.

3 whole butternut squashes (the stem and skin are very tough)
1 stick of butter
1/2 C AP flour
4 C chicken stock (organic, free-range, low sodium, if possible)
garlic (to taste)
rosemary (to taste)
cumin (to taste)
thyme (1 t at the most)
coriander (1t at the most)
black pepper (to taste)
sea salt (to taste)

So, as I said, with some of my recipes it's a bit tough since I don't measure, but I think you'll get the gist. Once the squash is roasted (per above instructions, 45 min-1 hr, until fork tender), let cool and scrape flesh into large bowl.
Start the roux: In a large pot, melt the butter, add the flour and cook for a minute, then add the chicken stock. (I used to add a little cream, but I already got in trouble with the wifey for adding the butter...). Then add the squash and spices to taste. At this point it's basically done, just taste and add spices as necessary. It will store for a week or so in the fridge, but if your family is like mine, it won't last too long.
Here's a little photographic proof:

From an extra large batch I made.

Finito!


Here's a little fun fact. We're trying to cook a bit healthier so I substituted the butter for coconut oil (while butter is a thousand times better than margarine, a little goes a long way, and it's better from grass fed cows which can get a bit pricey). Anyway, it turned out good, the coconut seemed to pair well with the squash.


Buon Appetito!


Friday, November 1, 2013

Pumpkin Cheesecake, not one of mine, but looks tasty...


Ingredients
Yield: 10 – 12 slices.
Crust
  •     Use an 8-inch spring-form pan
  •     1 and 1/2 cups graham cracker crumbs
  •     1 cup ginger snap cookies
  •     1/4 cup sugar
  •     1/2 teaspoon cinnamon
  •     8 tablespoons melted butter
Cheesecake Filling
  •     3 8-ounce packages cream cheese
  •     1 15-ounce can pure pumpkin
  •     2/3 cups light brown sugar
  •     3 eggs
  •     1 teaspoon vanilla
  •     1/2 teaspoon salt
  •     1/2 teaspoon ground cinnamon
  •     1/2 teaspoon nutmeg
  •     1/4 teaspoon ground ginger
  •     1/4 teaspoon ground cloves
Sour Cream Layer
  •     1 cup sour cream
  •     1/4 cup sugar
  •     1 teaspoon vanilla
  •     1/8 teaspoon cinnamon
  •     1/8 teaspoon nutmeg **freshly ground if available
Whipped Cream
  •     2 pints heavy cream
  •     1/4 cup sugar
  •     1/2 teaspoon vanilla
  •     Additional toppings:
  •     Caramel sauce
  •     gingersnap crumbs


Instructions

Crust preparation

In a medium sized bowl, combine graham cracker crumbs, ginger snap crumbs, sugar, and butter; mix well. Press crust into a spring form pan. Press the crust about halfway up the side of the spring form pan. Refrigerate crust while you continue to prepare the cheesecake.

Filling preparation
Allow extra time for mixing up this filling. Remove the pure pumpkin puree from the can and place in a couple of large paper towels. Wrap the pumpkin puree with the paper towels; this will soak up the excess water in the pumpkin puree. Continue to remove excess water from the pumpkin puree for about 60 minutes before making cheesecake mixture. Bring the remaining ingredients for the filling to room temperature while the pumpkin puree is being drained. With a mixer, beat cream cheese until smooth; add eggs one at a time and then combine all ingredients for the filling in a mixer. Blend until very smooth. For best results, allow all ingredients to reach room temperature before mixing the filling. Remove crust from refrigerator, and pour in filling.
Bake cheesecake at 350 for 30 minutes and then reduce temperature to 325 degrees for an additional 30 minutes. When you remove the cheesecake, it should be slightly jiggly in the center.The cheesecake will set up nicely as it cools.

Sour Cream Layer
When you remove the cheesecake from the oven, set aside and prepare the seasoned cream cheese layer. In a small bowl, combine sour cream, sugar, and spices. Blend well. Spread seasoned sour cream mixture over the baked cheesecake evenly. Place the cheesecake back into the 325 degree oven for about 8 minutes, until the sour cream layer is set.

Whipped Cream
Allow the cheesecake to cool. When the cheesecake is completely cool, you can add the whipped cream. In a medium sized bowl, combine heavy whipping cream, vanilla, and sugar; mix well with a blender or a stand mixer. Whip the cream until it forms stiff peaks. Remove ring from the spring-form pan and either pipe the whipped cream over the pumpkin cheesecake or spread with a knife.
When you are ready to serve the Olive Garden Pumpkin Cheesecake, cut each slice, drizzle the top of the cheesecake with caramel sauce, and then sprinkle over ginger snap crumbs before serving.


Buon Appetito!